
I decided I'd post some WIP pictures of some models I made. I have a terrible condition, a disease no less, that I'm never happy. Consider the Queen from Blackadder II. That's me, but about things I make.
Here is a Command Chimera. There was a time when nobody thought of adding a Predator turret to a chimera. Then I came along and copied the idea.
Right so, basic rundown. Take a chimera chassis. And a predator turret (remarkably hard to come by nowadays) I think eBay may be the way to go.
The lasguns on the back of the Chimera model always made me think of rowing. I attend a university where many people think that going rowing means that they are more suited to being there. Consider false social mobility. Personally I like the local, where I can get a pint for £1.40 and telling the lecturers stories (can be remarkably fun...). No point pretending to be a Posh lad.
So, in essence, I don't add the lasguns on the back.Shave away the the lasgun ports (don't worry too much about making a mess) Then I used some thin sheet styrene (0.25mm) to cover the area, (for some real inspiration using sheet styrene check out this blog (http://recalcitrantdaze.blogspot.com/) the OP is used to me bugging him 24/7 about how to use sheet styrene and in all honesty has taught me what I know.
This makes the vehicle look better in my opinion, in terms of those lasguns, they can't fire downwards, so unless they shoot fireworks there's not a lot of point, it also makes the vehicle more sleek at the rear.

I replaced the mantle area (I think there's a skull there?) with a plate of 0.5mm styrene, with a rivet in each corner (rivets can be easily made by using a sharp knife, and cutting a thin section from a 0.75mm round rod). I then added a brass etch eagle to it. I think that one was from the old Games Workshop basing set.
I replaced the cupola with one from the Imperial Guard Accessories Sprue.
I added sandbags. Sandbags can be a very nice addition to tanks, they can easily be made by rolling a sausage of greenstuff (use a new plastic freezer bag with a pool of water on) roll the green stuff sausage by moving your hand back and forth over it, but apply some lateral pressure to prevent getting marks in it.

The idea was basically to hide the plain shape of the Predator turret. Though I left the Autocannon on because I felt it looked very good. There are a few Space Marine weapons I'd give to the Guard, and vice versa.
The side skirts were made quite simply.
1) choose the size of skirt you want. Cut an equilateral shape to match this.
2) remove the sharp edges on the top.
3) cut the skirt into three, at the point the slope ends.
4) gently sand the internal join of the skirt, then match them together again (so you have a gentle recess where they meet).
5) if you want them removeable, more work will be required but I attached them with a hook system. Made by creating a recess the size of the matching piece on the skirt. So it fitted together. It may help to paint these parts seperately.
Stowage!
People have started adding stowage to Imperial Guard tanks in the past couple of years. It really does add some extra texture to the model as well as interesting detail.
I use a Tamiya 1/35 scale kit called "Allied Vehicle Accessories" as well as some scratch built stuff. As I mentioned previously, the missile tubes and launcher were scratchbuilt from Elysian design. I made one to look like an AT-4.
The strap was made with a strip of thin plasticard. Glue one side, let it dry (hour or two) then add to the other side, you can pull it taught then without it breaking.

After speaking to another blogger yesterday, Maelstrom (his blog is a fantastic foray into what's cool about GW models). Find it here: http://maelstrom-therisingsign.blogspot.com/ (Scroll down a bit for some scratchbuilt Valhallans) I decided I would post up some camouflage tutorials.
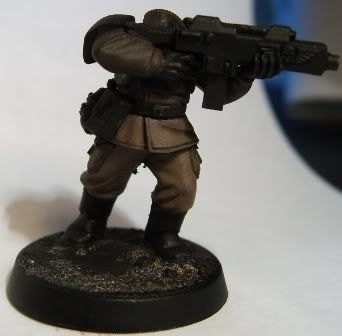
German Camouflage Autumn Oakleaf.
Colours required:
Vallejo Model colours:
German Camouflage Black Brown
Chaos Black
German Camouflage Light Brown
German Camouflage Pale Brown
Basecoat the area with Black Brown.

Wash with chaos black (water down heavily, ~1/5) with a glazing medium (dish soap, glaze medium, varnish) whatever. I use Vallejo glaze medium for the matte finish.
Highlight by adding Pale Brown. Giving a desaturated look to the area. Repeat this step once or twice to get a nice finish.
Add patches of Black Brown (consult a German Autumn Oakleaf picture for shapes).
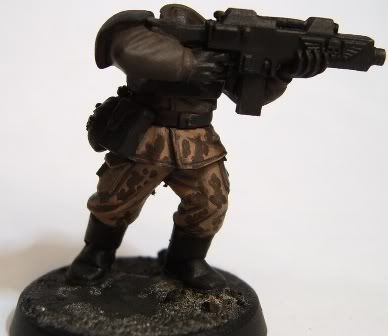
Gently dot in Light Brown to fill the patches with a nice border around.
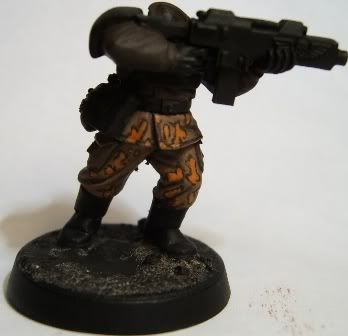
Add some smaller dots of Black Brown then add the light brown again.

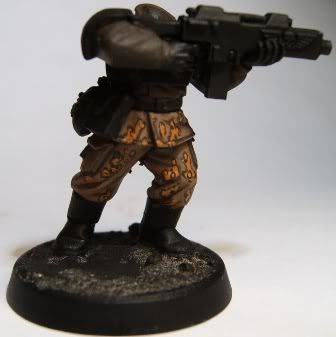
That's all folks!
Steve
Awesome post dude, the chimera looks ace, but its the camo tutorial that I like the best.
ReplyDeleteI think I shall pick up the colours you have listed but also get some greens to do summer/spring oak leaf as well :D
"There was a time when nobody thought of adding a Predator turret to a chimera. Then I came along and copied the idea."
ReplyDeleteHate to tell you this but i'd already done two before you knocked that Chimera out...
Stowage did look very nice on these, still going to cast some stowage up when you get the kit?
That's what I said! I copied it!
ReplyDeleteYeah definitely going to be casting. Will do a set for the trenches too.
Cheers Si! ModelZone do Vallejo colours (and tamiya x20a thinner) which means no more postage charges... Take a look.